
Mastering Sync with GitHub for Your Web3 Project
Syncing with GitHub is all about connecting your local project to a remote repository. This is what makes version control, team collaboration, and automated workflows possible. In practice, it means you'll use Git commands to push your local code changes to GitHub and pull updates from everyone else, creating one single source of truth for the entire team.
For any developer today, this is ground zero for building software collaboratively.
Connecting Your Project to the Global Code Hub
Learning to sync with GitHub isn't just about backing up your code. It’s about plugging your project into a massive ecosystem built for teamwork and automation. This is even more true when you're building with a tool like Dreamspace, a vibe coding studio where you're often iterating and making changes fast.
A smooth sync workflow is a must-have. It makes GitHub the central nervous system for your project's history, making sure every single person on your team is on the same page.
Why a Solid Sync Workflow Matters
The payoff for having a well-oiled sync process is huge. It instantly makes collaboration easier by giving you a clear, transparent history of who changed what and when—which is a lifesaver for tracking down bugs or building out new features. This solid foundation is also what lets you tap into powerful automation.
And if you’re diving into decentralized app development, that level of transparency and control isn't just a nice-to-have; it's essential.
Here’s why you should nail this down from the start:
- Version Control: You get a reliable history of your project. If something breaks, you can just roll back to a version that worked.
- Collaboration: Multiple people can work on the same project without stepping on each other's toes, all thanks to branching and merging.
- Automation: It’s the starting point for your CI/CD pipelines, kicking off automated tests and deployments whenever you push new code.
GitHub’s Dominance in Development
Just look at the numbers. GitHub is the place for version control, with over 100 million developers on the platform as of early 2025. It's home to more than 420 million repositories, which really shows how central it has become to software development.
By mastering the sync between your local work and GitHub, you’re doing more than just managing files. You are plugging into the operational core of the entire developer community. This connection is what turns your local project into a real, deployable application.
Once you get the hang of basic syncing, you can start exploring other cool things, like learning how to host a website directly on GitHub. Dreamspace, as an AI app generator, is designed to make that leap from local idea to globally deployed project feel totally seamless.
Making the First Connection to GitHub
Alright, this is where the magic happens. Your local project, maybe something you just whipped up with an AI app generator like Dreamspace, is about to go live on the world’s biggest stage for developers. Getting it synced up with GitHub for the first time is a rite of passage, and it all boils down to a few key commands that will become second nature.
But here’s a pro tip: don’t just blindly copy-paste commands from a tutorial. When you understand why you’re running each one, Git stops being this confusing black box and starts feeling like a superpower.
We'll kick things off by setting up the most secure and universally accepted way to connect: SSH keys.
Setting Up Secure Authentication with SSH
Before you can push a single line of code, GitHub needs to verify that it’s really you. You could type your password every single time, but that gets old fast and isn't the most secure route. Instead, we'll use an SSH key, which is basically a digital keycard for your computer. It proves your identity without you ever having to type a password.
First things first, you need to generate a new SSH key pair right on your machine. This one-liner creates two files: a private key that never leaves your computer and a public key you’ll share with GitHub.
ssh-keygen -t ed25519 -C "your_email@example.com"
With your key generated, you just need to copy the public part and hand it over to GitHub.
You'll find the spot to do this in your GitHub account settings. It's a straightforward process—just paste the key you copied.
Giving your key a memorable title like "MacBook Pro M2" or "Workstation PC" is a good habit. It's a lifesaver when you work from multiple machines and need to know which key is which. Once that's done, GitHub will recognize and trust your computer. No more password prompts.
Initializing and Pushing Your Project
With your secure connection established, it's time to get your project ready for its big debut. This involves three main actions: telling Git to start tracking your project, saving a snapshot of your files (a "commit"), and then pushing that snapshot up to a new repository on GitHub.com.
Let's run through the exact sequence you'd use for a new project.
Initialize Git: Pop open your terminal, navigate to your project's main folder, and run
git init. This simple command creates a hidden.gitfolder and officially turns your project into a local Git repository.Stage Your Files: Next, you need to tell Git what to include in your first snapshot.
git add .is the command to stage all the files in your current directory.Make Your First Commit: A commit is a permanent record of your project at a specific moment. The message you write is crucial, so make it count.
git commit -m "Initial commit: Add project structure and smart contracts"
Your commit messages are like a diary for your project. A good message tells a story to your future self and your teammates about what changed and why. Don't skimp on this—you'll be thankful later.
The final step is to link your local folder to the empty repository you created on GitHub and send your code up.
git remote add origin git@github.com:your-username/your-repository.gitgit push -u origin main
This two-command combo sends your first commit to GitHub, setting up the main branch as the foundation for all future work. And just like that, you've successfully synced your project.
Mastering the Daily Sync Workflow
Version control isn't something you set up once and forget about. It's a daily rhythm, a professional habit. Now that you've connected your project from a vibe coding studio like Dreamspace to GitHub, the real work of keeping everything in sync begins.
Your daily dance with GitHub boils down to two core commands: git pull and git push. Think of it as a constant conversation between your local machine and the central repository where your team collaborates.
Before you even think about writing a line of code, your first reflex should be to run git pull. This command grabs all the latest updates from the remote GitHub repo and merges them into your local copy. It's the equivalent of asking, "Hey, what did everyone else get done since I last checked?" This simple habit prevents a world of pain and ensures you're always building on the latest and greatest version of the project.
In fact, developers who practice frequent, small integrations are over 50% less likely to run into nasty merge conflicts compared to those who push large, infrequent updates.
Why You Should Never Work Directly on main
Working directly on the main branch is like performing open-heart surgery in the dark. It’s incredibly risky, and one tiny mistake can bring the entire project to a screeching halt for everyone. This is precisely why feature branching is a non-negotiable part of any professional workflow.
The concept is straightforward: for every new feature, bug fix, or even a small experiment, you create a new, separate branch. This keeps your main branch pristine, stable, and always ready to be deployed.
Here's how it looks in practice:
- Create a Branch: Before building that new user dashboard, you'd create a descriptive branch:
git checkout -b feature/new-user-dashboard - Work in Isolation: Now you can code freely. All your commits happen on this branch, completely isolated from everyone else's work.
- Merge with Confidence: Once the feature is built and tested, you merge it back into the
mainbranch, knowing it won't break anything.
This workflow is especially crucial when using an AI app generator like Dreamspace. You're often iterating quickly on different parts of the application, and branching gives you the safety net to experiment without fear.
Don't Panic: A Guide to Merge Conflicts
It’s going to happen. You’ll go to git pull or merge a branch, and Git will throw up its hands and report a "merge conflict." All this means is that you and a teammate edited the exact same lines in the exact same file, and Git is confused about which version to keep.
Take a deep breath. It's not a bug; it's Git asking for your help.
Your code editor will highlight the conflicting changes, showing you both versions side-by-side. Your task is to play editor—manually fix the file by combining the changes into a final version that works.
A merge conflict isn't an error. It's a collaboration checkpoint. It’s a signal to talk to your teammate, make sure both of your contributions are integrated correctly, and keep the project's integrity intact.
Once you’ve resolved the conflict in the file, you just git add the now-fixed file and then git commit to finalize the merge. Getting comfortable with this process is a key milestone that marks the transition from a beginner to a seasoned developer who can confidently sync with GitHub.
To help you with your daily workflow, here's a quick reference table of the most common commands you'll be using.
Essential Git Commands for Daily Syncing
This table is a handy cheat sheet for the Git commands you'll use most often to sync your Dreamspace project with GitHub and manage its version history.
Keep these commands close by. They form the backbone of a solid, collaborative development process and will quickly become second nature.
Automating Your Deployments With GitHub Actions
I used to spend hours clicking through manual uploads—one typo and the whole build would fail. With GitHub Actions, a simple git push becomes the green light for testing and deployment.
In a project from a vibe coding studio like Dreamspace, this shift means every merge can go live almost instantly. No manual handoffs, no late-night fixes.
Demystifying CI/CD With A Workflow File
Inside your repo, create a folder named .github/workflows. That’s where a YAML file defines each step GitHub should follow when you push changes.
A typical web app pipeline looks like this:
- Checkout: Grab the latest code.
- Setup Environment: Install the right Node.js version.
- Install Dependencies: Run
npm ciornpm install. - Run Tests: Verify nothing broke.
- Deploy: Push your build to Vercel, Netlify, or another host.
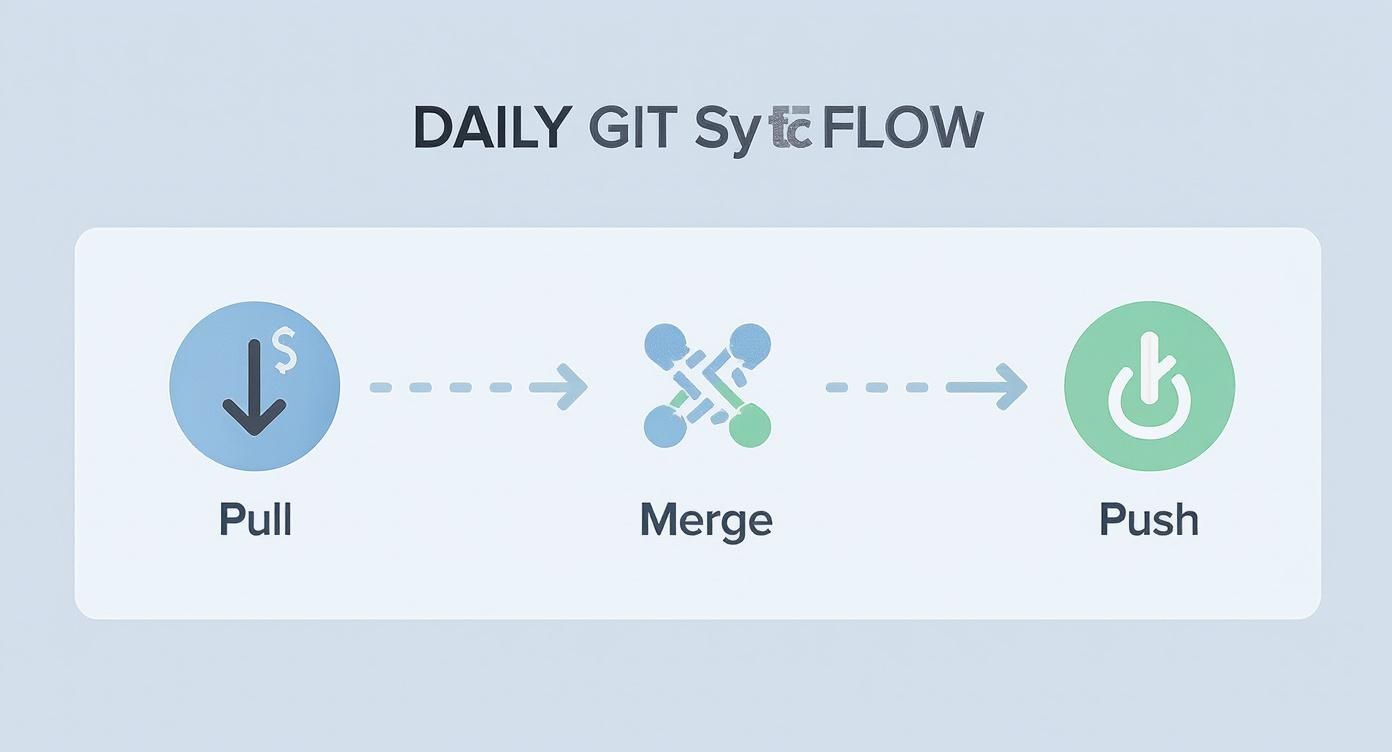
That graphic lays out the familiar Git loop—pull, merge, push—which kicks off the automation.
Crafting Your First GitHub Action
Let’s set up a file named deploy.yml in .github/workflows/. Start by telling GitHub when to run:
name: Deploy to Productionon:push:branches:- mainNext, define your job. We’ll call it build-and-deploy, running on Ubuntu:
jobs:build-and-deploy:runs-on: ubuntu-lateststeps:- name: Checkout codeuses: actions/checkout@v4- name: Set up Node.jsuses: actions/setup-node@v4with:node-version: '20'- name: Install dependenciesrun: npm ci- name: Build projectrun: npm run buildUsing community actions like actions/checkout@v4 and actions/setup-node@v4 saves hours of configuration. For a deeper look into how AI is shaping these automated environments, you might find it interesting to learn more about building with a vibe coding app.
Automating your pipeline stops the “it works on my machine” drama, giving you consistency and confidence every time.
The final move is adding a deploy step—often a third-party Action plus an API token stored securely in GitHub Secrets. Commit your YAML, and GitHub transforms into your personal deployment engine.
If you’re expanding into mobile, see how similar principles apply in React Native app deployment workflows.
When you sync your project to GitHub, the first thing that probably comes to mind is versioning your code—smart contracts, React components, maybe some backend logic. But in a modern Web3 project, especially one built with an AI generator like Dreamspace, your codebase is only part of the story.
You also have complex, structured data assets that are just as vital. I'm talking about SQL schema migrations and the queries you use to pull data from the blockchain. If these fall out of sync with your application code, things break. Fast.
Keeping Your Database and Code in Lockstep
Here’s a scenario I’ve seen play out too many times: a deployment fails because the application code expects a database column that doesn't exist yet. The core challenge is making sure your database schema changes are applied in the exact same sequence as the code that relies on them.
This is where migration files, tracked right in your Git repo, are an absolute lifesaver.
Most developers use a migration library that spits out timestamped SQL files for every single schema change. Each file has the commands to apply the change (the up migration) and, just as importantly, to revert it (the down migration).
The workflow looks something like this:
- Need a new table? You generate a migration file, maybe named
20250115103000_create_users_table.sql. - Commit and push. This file gets committed right alongside the feature code that needs it.
- Automate it. Your CI/CD pipeline, triggered on a push to
main, runs a command to apply any new migrations before it deploys the new application code.
This simple process makes your database structure a versioned, auditable part of your project’s history. It guarantees the database is always in the right state for whatever version of the code you’re deploying.
Treating your database schema migrations as first-class citizens in your repository is the single best way to prevent deployment failures caused by mismatched application and data layers. It creates a single source of truth for your entire stack.
Versioning On-Chain Data Queries
In the Web3 world, your "backend" is often a mix of smart contracts and indexed blockchain data, which you’re probably accessing with SQL or GraphQL. These queries can get seriously complex, pulling from multiple contracts or filtering for specific on-chain events.
And just like your code, these queries change over time.
A solid strategy is to store your blockchain data queries in their own dedicated files within your repository. I like to organize them by feature or the type of data they're grabbing. For instance:
queries/user/get_nft_holdings.sqlqueries/protocol/get_tvl_history.graphql
When you version these files, you get a crystal-clear history of how your app is talking to the blockchain. If a smart contract gets an update, the pull request will show both the contract change and the corresponding query modification.
This tight coupling is a game-changer for maintainability and makes debugging way less painful. Of course, for any complex on-chain logic, you'll also want to lean on smart contract audit tools to ensure everything is secure and working as intended before you even start writing queries against it.
Untangling Common GitHub Sync Problems
Let's be real—even the most experienced devs get tripped up by Git sometimes. You run a simple sync command, and suddenly you're staring at a cryptic error message, wondering where you went wrong. Don't sweat it. Most of these hiccups are pretty common and easier to fix than they look.
https://www.youtube.com/embed/e9lnsKot_SQ
One of the classics is the dreaded permission denied (publickey) error. Nine times out of ten, this just means your local SSH key isn't playing nice with the one you've added to your GitHub account. The first thing you should always do is pop into your GitHub settings and double-check that your key is there and correct. It’s a simple check that can save you a ton of headaches.
Oops, I Committed My API Key
We’ve all had that heart-stopping moment. You've just committed a sensitive API key or password, and now it's immortalized in your project's history. If you push that to a public repo, you've got a serious security problem. But thankfully, you can fix it.
The trick is to completely rewrite your project's history to scrub that sensitive data. Just deleting the file in a new commit won't cut it—the secret will still be lurking in previous commits.
- If it’s in your very last commit: (And you haven't pushed it yet!) You can use
git reset --soft HEAD~1. This undoes the commit but keeps your changes, so you can remove the sensitive file and then commit again. - If it’s buried in older commits: You'll need a more powerful tool. The modern, recommended way to handle this is with
git filter-repo. It’s designed specifically for scrubbing your entire history clean.
As soon as a secret hits a public repository, you have to assume it's compromised. Revoke the key or change the password immediately. Don't wait, even after you've cleaned up your Git history.
What’s This "Detached HEAD" Thing?
Running into a "detached HEAD" state sounds way more alarming than it actually is. All it means is that you've checked out a specific commit hash directly, instead of a branch. Think of it like you’re looking at a single, historical snapshot of your code, separate from any active timeline of development.
Getting back on track is easy. You just need to hop back onto a branch. The simplest fix is to create a new branch right where you are: git checkout -b my-new-branch. This move saves any work you might have done while detached and puts you right back into a normal workflow.
Ready to build and deploy your on-chain app without getting tangled in Git issues? Dreamspace is the vibe coding studio that lets you generate smart contracts, SQL blockchain queries, and a full front-end with AI, making your development flow seamless from start to finish. Start building at dreamspace.xyz.