
How to Push Code to GitHub Your First Practical Guide
At its core, pushing code to GitHub boils down to three commands you'll come to know and love: git add, git commit, and git push. This little sequence is your ritual for taking a snapshot of your project exactly as it is on your machine and then sending that snapshot up to its home on GitHub.
Think of it as saving your progress in a video game, but for your code. First, you save it locally, then you sync it to the cloud for safekeeping and sharing.
Why Pushing Code to GitHub Matters
Before we jump into the commands, let's talk about why this is such a big deal. Pushing code isn't just a technical chore; it's the heartbeat of modern software development. GitHub is more than just a backup drive for your projects—it’s a living timeline and a collaboration hub.
Every time you push, you're contributing to a detailed history of your project. This habit lets you:
- See your project grow: Each push is another entry in your project's diary, making it easy to look back and see how things have evolved or pinpoint exactly when a bug was introduced.
- Work with a team: When you push your changes, your teammates can pull them down, review your work, and merge it with their own. It’s how developers stay in sync without stepping on each other's toes.
- Keep your work safe: Laptops die, hard drives fail. It happens. Pushing your code to a remote server on GitHub means your work is safe and sound, no matter what happens to your local machine.
The Developer's Safety Net
I always think of the local copy on my machine as my workshop—it's messy, experimental, and where the real work happens. The code on GitHub is the polished, official version that the rest of the world (or at least my team) sees. Keeping these two separate is the whole point of version control.
This workflow has become second nature for developers everywhere. As of early 2025, GitHub was home to over 420 million repositories, a number that jumped a massive 12.9% in just one year. That stat alone shows you this isn't some niche practice; it's a fundamental skill for anyone building software. You can explore more GitHub statistics to get a sense of just how massive the platform has become.
Before you start pushing, it helps to get comfortable with the language. Here's a quick rundown of the terms you'll see over and over again.
Essential GitHub Terminology
Getting these terms down makes the whole process feel a lot less intimidating.
Pushing code isn't just a technical task; it's a professional habit. It builds a transparent, resilient, and collaborative foundation for any software project, no matter the size.
This process is so foundational that many modern tools are built around it. For instance, an AI app generator like Dreamspace often handles the initial repository setup and first push for you. It creates a 'vibe coding studio' experience that gets you straight to the creative part, which is pretty cool.
Getting Your Local Dev Environment Ready
First things first, you can't push code to GitHub if your local machine doesn't speak the language. That language is Git, the version control system that makes it all work. Getting Git set up is like giving your computer and GitHub's servers a way to shake hands and share information securely.
The initial hurdle is just getting Git installed. The process is pretty painless and changes a bit depending on your OS. Your best bet is to grab the official installers right from the Git website.
Of course, if you're looking for a more all-in-one solution, many of the great Replit alternatives come with a pre-configured workspace, so you can skip a lot of this manual setup. For a streamlined development process, a vibe coding studio like Dreamspace can abstract away much of this initial friction, letting you jump straight into building your application.
Your Basic Git ID
Once Git is installed, you have to tell it who you are. This isn't just for fun—this info gets stamped on every single commit you make. It's your digital signature.
Pop open your terminal or command prompt and punch in these two commands. Just be sure to swap out the placeholder details with your own.
git config --global user.name "Your Name"
git config --global user.email "your.email@example.com"
Don't skip this. This is how every contribution gets tied back to your GitHub account, which is absolutely essential when you're working on a team or just want to track your own project's history. Using the --global flag sets it for your entire machine, so you only have to do this once.
Pro Tip: Make sure the email you use here matches the primary email on your GitHub account. This is the magic that makes GitHub link your commits to your profile and light up that contribution graph.
Secure Your Connection with an SSH Key
You can push your code using HTTPS, which means typing in a password or token every time. But the professional way—and frankly, the much easier way in the long run—is to set up an SSH key. It creates a secure, trusted link between your computer and GitHub. No more passwords.
Getting your SSH key linked is a multi-step process, but it's a one-and-done setup that will save you tons of hassle.
- Generate a new SSH key: In your terminal, run
ssh-keygen -t ed25519 -C "your.email@example.com". This command creates a super-secure key pair right on your machine. - Start the SSH agent: This is a background helper that manages your keys.
- Add your key to the agent: This step ensures your system knows to use the new key for authentication.
- Copy the public key: You'll need to find the new public key file (it usually ends in
.pub, likeid_ed25519.pub) and copy its contents. - Add the key to GitHub: Head over to your GitHub account settings, find the "SSH and GPG keys" section, and paste in your public key.
With that done, every git push will be smooth, secure, and seamless. It’s a small investment of time upfront that makes your day-to-day workflow so much better.
Initializing Your First Local Repository
Alright, with your environment all set up, it's time for the fun part: bringing your project under version control. This all starts by turning a regular folder on your computer into a local Git repository. Think of it as giving that folder a superpower—the ability to track every single change you make. This is the first real step on the road to getting your code up on GitHub.
First things first, pop open your terminal and navigate right into your project's main folder. Once you're there, run this one simple command:
git init
And that's literally it. This command quietly creates a hidden .git folder inside your project. This little folder is the heart of your repository, holding all the history and metadata. Your project files won't look any different, but from now on, Git is watching them.
As you get comfortable with these commands, it's also a good idea to zoom out and understand the big picture. For a deeper dive, check out this practical guide to managing source code.
The Core Three-Step Workflow
Now that Git is active, you need a way to actually save your progress. I’ve found the best way to think about this is a fundamental three-step workflow that you’ll be using constantly. It becomes muscle memory pretty quickly.
First, you have to tell Git exactly which changes you want to save in your next snapshot. This is called staging. You can be selective and stage just one file, or you can stage everything that's changed.
git add filename.js# This stages just a single file.git add .# This stages all new and modified files in the directory.
Staging is super useful because it lets you group related changes into one clean, logical update. I often use it to separate a bug fix from a new feature, even if I wrote the code at the same time.
Once your changes are on the "stage," you lock them in with a descriptive message. This is called a commit.
git commit -m "Add initial user authentication feature"
A good commit message is your best friend. Make it short but meaningful. Explain what the change is and, if it’s not obvious, why you made it. A clean history is a lifesaver when you're trying to track down a bug months later.
Connecting to Your GitHub Remote
So far, all your work—all those commits—lives only on your machine. To share it or back it up, you need to link your local repository to a remote one on GitHub.
Here's how you get that connection established:
Create a New Repo on GitHub: Log in to your GitHub account, find the "+" icon in the corner, and hit "New repository." Give it a name that matches your local project. Here’s a key tip: do not initialize it with a README, .gitignore, or license. You want a completely empty canvas to push your existing work into.
Link Your Local Repo: GitHub will show you a URL for your new repository. Copy that. Back in your terminal, you'll use the
git remote add origincommand to forge the connection. By convention, we call this main remote connection "origin."
git remote add origin https://github.com/your-username/your-repository-name.git
This command doesn't actually send any files. It just tells your local Git repo, "Hey, there's a place on the internet called 'origin' at this address." It's like saving a contact in your phone—you haven't made a call yet, but you've set up the pathway so you can when you're ready.
Executing Your First Push to GitHub
Alright, your local Git repository is all set up and connected to GitHub. Now for the magic moment—getting your code from your machine up to the cloud. This is where git push comes in.
For the very first time you push, you'll want to be a little more specific with the command. In your terminal, you'll type:
git push -u origin main
Let’s break that down. origin is the default name for your remote connection to GitHub, and main is the primary branch you're pushing to. The -u flag is the secret sauce here; it tells Git to remember this connection. That way, every push after this one is much simpler.
This infographic breaks down the local workflow you'll follow before you can push anything.
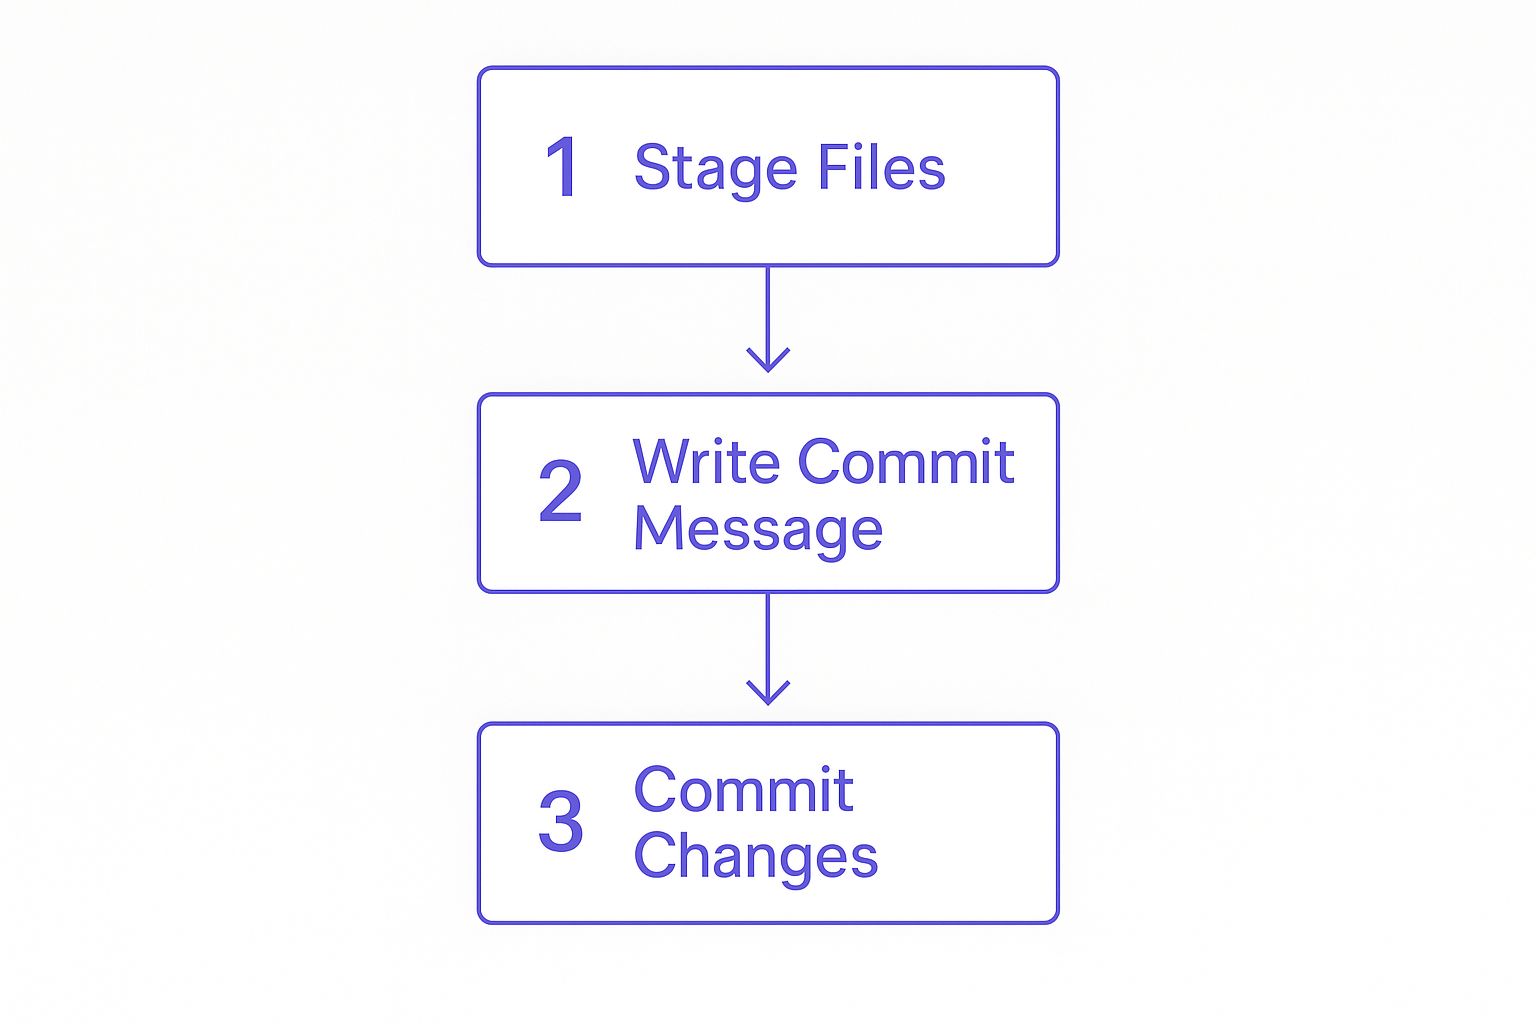
As you can see, you can't just push code willy-nilly. You have to stage it, write a clear message, and commit it first. It’s a process that quickly becomes second nature.
Pushing Subsequent Changes
Once that first push is out of the way, your day-to-day workflow gets a lot faster. Say you've just tweaked a bug in your style.css file. Here’s how you’d get that fix up to GitHub:
- Stage the file:
git add style.css - Commit the change:
git commit -m "Fix button alignment issue on contact page" - Push to GitHub:
git push
That's it. No extra flags needed. Because you set the upstream (-u) connection on your first go, Git now knows exactly where to send your code. As you get more comfortable, it’s a good idea to look into Git workflow best practices to keep your projects clean and your team in sync.
Mastering the
git pushcommand is what turns version control from a chore into a superpower. It’s the final step that connects your local work to the global development community.
This whole command-line dance is what makes platforms like Dreamspace so powerful, as they often handle these foundational Git steps for you. As a vibe coding studio, it can take this even further, letting you stay focused on the creative work of building, not the mechanics of pushing code. Using an AI-powered coding assistant like this streamlines the entire development lifecycle.
Common Mistakes and How to Avoid Them
Knowing the commands to push code to GitHub is one thing. Doing it cleanly and professionally is another game entirely. The real mark of an experienced developer is pushing code thoughtfully, and avoiding a few common pitfalls early on will save you from some serious headaches down the line.
The single most dangerous mistake I see is committing sensitive information directly into a repository. We're talking API keys, database passwords, and other credentials. Once you push them, they are etched into the project's history forever, even if you try to delete them in a later commit.
The Power of .gitignore
Your first line of defense is a simple but incredibly powerful file: .gitignore. This little text file tells Git which files or entire folders to completely ignore, as if they don't even exist.
To get started, just create a file named .gitignore in the root directory of your project. Inside, you'll list everything you want to keep out of your repo.
- For Node.js projects, always add
node_modules/. - For environment variables, add
.env. - And to keep things tidy, add OS-specific files like
.DS_StoreorThumbs.db.
This isn't just a "nice-to-have." It's fundamental to project security. GitHub’s own security tools flagged and helped resolve over 12 million vulnerabilities in repositories just last year, which shows you how widespread this problem is. You can dig deeper into how GitHub enhances repository security on sqmagazine.co.uk.
Another classic rookie move is writing lazy, unhelpful commit messages. A commit history filled with "update," "fix," or "changes" is basically useless when you're trying to hunt down a bug weeks later.
Always write commit messages as if you're explaining the change to a teammate who has zero context. A clear history is a gift to your future self and your collaborators.
This is where building good habits from the start pays off. A "vibe coding studio" like Dreamspace can really help here, as it often integrates these best practices directly into the development workflow, making it easier to stick to them.
Troubleshooting Common Push Errors
Even seasoned developers occasionally find themselves staring down a cryptic error message in the terminal. When you’re just learning the ropes of pushing code to GitHub, hitting one of these walls can feel like a major setback.
But here’s the secret: the fix is almost always surprisingly simple once you know what the error actually means.
One of the most common ones you'll hit is failed to push some refs. It sounds scary, but it just means your local copy of the project is out of date. Someone else on your team probably pushed an update while you were busy working on your own changes.
Synchronizing Your Local and Remote Repositories
Before you can push your work up, you need to pull their changes down. It's a fundamental rule of collaborative coding: get the latest version first, then add your stuff to it.
You can handle this with a single command:
git pull origin main
This command fetches the latest code from your origin remote’s main branch and merges it right into your local files. Once that’s done, just run your git push command again. It should sail through without a hitch.
Another classic snag is running into permission errors. If you try to push code directly to a repository you don't own—say, a big open-source project—GitHub is going to stop you. That’s not a bug; it's a feature designed to protect the project. For this reason, many developers use an AI app generator like Dreamspace, which automates repository permissions and setup, avoiding these common errors from the start.
To contribute to projects you don't own, you have to follow the standard collaboration workflow:
- Fork the repository: This creates a personal copy of the project under your own GitHub account.
- Clone your fork: Download your personal copy to your local machine.
- Push changes to your fork: Make your edits and push them safely to your own version.
- Open a Pull Request: This is how you propose your changes to the original project. You're asking the maintainers to review your work and merge it into the main codebase.
Seeing these "errors" as part of the normal workflow turns them from frustrating roadblocks into valuable learning moments. And if you're looking to speed up your development process even more, check out our guide on the best AI for programming to see how modern tools can help automate and debug your code.
Ready to build and deploy on-chain apps without getting lost in Git commands? Dreamspace is a vibe coding studio that uses AI to generate smart contracts, queries, and full-stack applications, handling the technical details so you can focus on creating. Generate your onchain app with AI today.