
How to Change Branch in Git A Practical Developer Guide
Need to change branches in Git fast? The go-to command is git switch branch-name. If you need to create a new branch and jump right into it, use git switch -c new-branch-name. It's the modern, cleaner way to work, and frankly, much safer than the old git checkout command we all used to use.
Why Mastering Branch Switching Is Essential
Think about your typical day. You're probably hopping between a hotfix on one branch, a new feature on another, and maybe some experimental code on a third. Being able to switch between these contexts without friction isn't just a nice-to-have—it's the core of a smooth, organized workflow. Productive coding sessions hinge on your ability to change gears quickly and cleanly.
From Checkout to Switch
Having a solid grasp of branching is vital, especially as development tools get smarter. For instance, at Dreamspace, our AI app generator relies on a clean Git history to keep AI-powered development agile and bug-free.
Before 2019, the git checkout command was a bit of a Swiss Army knife, handling everything from switching branches to restoring files. This often caused a lot of confusion and "oops" moments.
Then, in August 2019, Git version 2.23 rolled out and gave us git switch. This was a game-changer. In fast-moving teams, where developers can easily switch branches over 50 times a week, this command made the whole process safer and more explicit. It cut down on context-switching time by making our intentions crystal clear. If you want to dive deeper, Cloudbees has a great write-up on this update.
A well-managed branching strategy is the backbone of collaborative software development. Mastering how to change a branch in Git is the first step toward preventing merge conflicts and maintaining a clean, logical project history.
So, why is this distinction between checkout and switch so important?
- Clarity of Intent:
git switchdoes one thing and one thing only: it switches branches. No more ambiguity. - Reduced Risk: It helps prevent you from accidentally overwriting files, a common pitfall with the overloaded
git checkout. - Workflow Efficiency: A dedicated command just makes life simpler, whether you're typing it manually or using it in scripts.
Understanding this evolution helps you write better, safer Git commands. On a related note, you might be interested in how an AI-powered coding assistant can streamline your entire development process even further.
Using Git Switch for Clean Navigation
Let’s talk about git switch, the modern way to hop between branches. It was introduced back in Git version 2.23 to give developers a dedicated tool just for switching branches, which makes it a much safer and cleaner option than the old, overloaded git checkout command.
Essentially, git switch just moves the HEAD pointer to a different branch and updates your files to match. It's the equivalent of telling Git, "Hey, I'm working on this branch now," without any extra baggage or potential side effects.
Switching to an Existing Branch
Most of the time, you'll just be moving to a branch that's already there. Say you need to jump over to the feature-user-auth branch to review some code. The command couldn't be simpler.
git switch feature-user-auth
Because this command only switches branches, you're far less likely to accidentally mess with files or end up in a weird state. That kind of focused design is a lifesaver in a busy environment—like the vibe coding studio at Dreamspace—where you need to iterate quickly without tripping over your tools.
The beauty of
git switchlies in its simplicity. It does exactly what its name implies, reducing cognitive load and letting you focus on the code, not the tool.
Creating and Switching in One Go
Here's where git switch really shines. You can create a new branch and immediately switch to it with a single command. It's perfect for when you're about to start a new feature, like a new API integration.
No more two-step process. Just do this:
git switch -c new-api-integration
The -c flag (short for --create) tells Git to both create the new-api-integration branch and make it your active one. Easy.
And here’s another little trick I use all the time:
- Jump Back Quickly: Use
git switch -to instantly go back to the previous branch you were on. This is super handy for when you just need to pop over tomainto check something, then jump right back into your feature branch.
By making git switch a regular part of your workflow, you're adopting a more intentional and safer way to work. It's a small change, but it makes a huge difference in your day-to-day coding.
Working with the Classic Git Checkout Command
While git switch is the new, cleaner way to handle branches, you're going to run into git checkout all the time. It's baked into countless tutorials, legacy projects, and the muscle memory of developers everywhere. For a long time, it was the command for jumping between branches, so you absolutely need to know how it works.
At its most basic, using git checkout feels almost identical to git switch. You just tell it which existing branch you want to move to.
git checkout your-feature-branch
This simple command has been a developer's daily workhorse for years. Branching is a non-negotiable part of modern workflows, especially for teams working on complex systems like SQL blockchain queries. It's a critical practice—in fact, 95% of projects now run pre-commit tests on separate branches to keep the main codebase clean and stable. This approach is what prevents merge conflicts and keeps teams moving fast. You can dig into more of these development stats from Hutte's research on Git-based workflows.
Git Switch vs Git Checkout Command Comparison
To really understand the shift from checkout to switch, it helps to see them side-by-side. The older git checkout is a multi-tool that handles everything from switching branches to restoring files, which can sometimes lead to mistakes. The newer git switch was created to do one job—and do it safely.
Ultimately, git switch gives you clarity and a safety net, while git checkout is the powerful original you still need to master.
Creating Branches with Checkout
Here's where git checkout gets a bit tricky and shows its age. It mashes together the action of creating a new branch and switching to it in one go using the -b flag.
git checkout -b new-feature-branch
This was a hugely popular shortcut, especially after it was featured in Vincent Driessen's famous Git Flow model back in 2010. It’s fast and efficient, but this dual-purpose behavior is precisely why the Git maintainers decided to create the more explicit and safer git switch -c.
The biggest knock against
git checkoutis that it's overloaded. Using the same command to swap branches and to blow away file changes is a recipe for "oops" moments. This is the core problemgit switchwas designed to solve.
So, while you should probably default to git switch in your own work for clarity's sake, getting comfortable with git checkout means you’ll be ready to jump into any project, no matter how old its codebase or its conventions are.
What to Do With Uncommitted Changes Before You Switch
It’s a classic scenario. You're deep in the zone, coding a new feature, when an urgent bug report lands on your desk. The fix is on another branch, but what about all the work you've just done? If you try to switch branches with uncommitted changes, Git will (thankfully) stop you. It’s a safety measure to prevent you from accidentally losing your work-in-progress.
You’ve got two main ways to handle this, and which one you choose really depends on the state of your current work. Is it a logical stopping point, or is everything still a bit messy?
This handy flowchart breaks down the decision. It's a simple choice, but one every developer makes constantly.
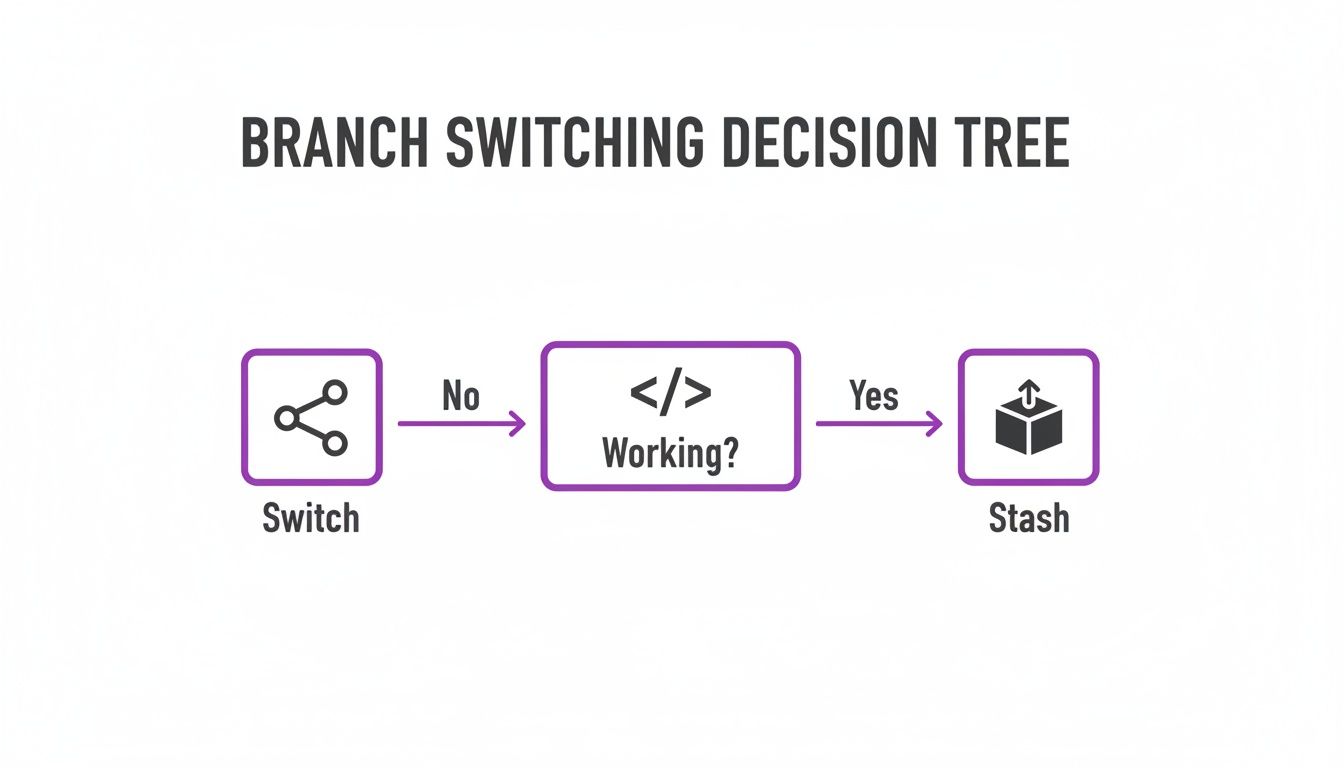
The bottom line is simple: if you have uncommitted changes, you almost always need to commit or stash them before you can safely hop over to another branch.
Option 1: Commit Your Changes for a Clean Slate
The most direct path is to just commit your work. If you've reached a good stopping point—maybe you just finished a specific function or a UI component—committing creates a clean slate. It saves a snapshot of your progress to the branch's history, and you're now free to switch branches without any friction.
This is the perfect move when your changes feel like a complete, self-contained thought. For example, let's say you're building a new smart contract feature for a DeFi protocol. You could commit the "initial event logging setup" before jumping over to that urgent bug fix. Your progress is safely recorded.
Option 2: Use Git Stash to Temporarily Shelve Your Work
But what if your code is a total mess? Half-finished, broken, and nowhere near ready for a commit? This is exactly what git stash was made for.
Think of it as hitting the pause button. The git stash command takes all your tracked, modified files and puts them aside in a temporary holding area—the "stash." Your working directory is instantly reverted back to its last committed state (the HEAD).
Now you can switch branches, do what you need to do, and when you're ready to come back, a quick git stash pop will bring all your changes right back into your working directory. You can pick up exactly where you left off. It's a lifesaver for managing context switching without cluttering your commit history with half-baked work.
Pro Tip: You can have more than one stash! I highly recommend using
git stash save "a quick descriptive message"to label your stashes. When you have a few things on the shelf, those messages make it way easier to remember what's what.
Navigating Remote Branches and Other Scenarios
Your local machine is just one piece of the puzzle. Real-world development is all about collaboration, which means you'll constantly be interacting with remote branches. Knowing how to grab a teammate's new feature branch to review it or add your own contributions is a skill you'll use every single day.
It's actually a lot simpler than it sounds.
First, you need to sync your local repository with all the latest updates from the remote, which includes any new branches. The git fetch command is perfect for this—it downloads all the new data without messing with your current work.
Once that's done, you can switch to the new branch directly.
# First, pull in the latest info from the remote server git fetch origin
# Now, jump over to your colleague's branch git switch a-colleagues-feature-branch
Git is clever here. It sees that a-colleagues-feature-branch exists on the remote (origin), so it automatically creates a local branch with the same name that’s set up to track the remote one. This kind of seamless workflow is exactly what we lean on at Dreamspace, where our vibe coding studio is all about rapid, collaborative iteration.
Understanding the Detached HEAD State
Every so often, you might run into a situation Git calls a "detached HEAD." It sounds a bit scary, but don't worry. It just means you’ve checked out a specific commit directly instead of a branch, usually because you wanted to look at an older version of your code.
A detached HEAD is like being a ghost in your project's timeline. You can look around and even make temporary changes, but you're not on any official branch. Any commits you make here will be lost once you switch away.
Getting back to solid ground is easy. You have a couple of options:
- Go back to where you were: The quickest fix is
git switch -. This command is a handy shortcut that hops you back to the branch you were on previously. - Save your new work: If you've made some experimental changes you decide you want to keep, just create a new branch right where you are with
git switch -c new-feature-from-old-commit.
Mastering these little nuances prepares you for the more complex twists and turns of a development cycle. In the same way, getting your development environment right is crucial. If you're exploring options, we put together a guide on some great Replit alternatives for coding in the cloud.
Got Questions About Switching Branches?
Let's dig into a few of the common sticking points people run into when they're first getting the hang of switching branches in Git. Nailing these concepts will save you a ton of headaches down the road and make you much more confident jumping around your project.
Key Differences and Common Scenarios
What’s the real difference between git switch and git checkout?
Think of it as focus versus flexibility. The git switch command was added in Git 2.23 to do one thing and do it well: switch branches. It’s clean and its purpose is crystal clear.
git checkout is the old-school, Swiss Army knife of Git commands. It can switch branches, but it can also restore files, which sometimes leads to nasty surprises like accidentally overwriting your work. For just hopping between branches, git switch is the modern, safer bet.
What happens if I have uncommitted work when I try to switch?
Git is smart. If your local changes clash with the code on the branch you're trying to move to, Git will hit the brakes. It stops you dead in your tracks to prevent you from losing your work.
You have a few options: you can commit the changes, stash them away for later with git stash, or just discard them if you don't need them anymore. Only then will Git let you switch.
How do I jump to a new branch that only exists on a remote repo?
First, you need to tell your local machine what's happening on the remote. A quick git fetch will pull down all the latest information without touching your current work.
Once that's done, you can just run git switch new-feature-branch. Git is clever enough to see that branch exists on the remote, so it will automatically create a local version that tracks it and switch you right over. Easy.
Remember, switching branches is a totally safe, non-destructive move. Your commit history isn't going anywhere. You can always hop back. The quickest way is
git switch -, which zaps you right back to the last branch you were on.
Getting this down is a core skill, especially when you're in a fast-moving environment like the Dreamspace vibe coding studio where clean, efficient version control is everything. If you're looking to speed up your workflow even more, check out our guide on the best AI for programming.
Ready to build onchain apps without the complexity? At Dreamspace, you can generate smart contracts, SQL queries, and full websites with AI. No code needed. Start building at https://dreamspace.xyz.